I've started to work on the basics of my pufferfish object/materials. This sphere I actually modeled rather than use a displacement map to create the spines because I wasn't quite sure how I would achieve downward facing spines using a displacement map. The textures/shaders on the sphere now are just temporary, I know they do not look the most amazing and the height texture messed with the spines a little bit. I'm currently using Mudbox to create some better normal, height, and diffuse maps for this object. For now, I wanted to test out some camera animation since I haven't worked too much with close-ups of the molecule. I think this particular shot will be better as a close-up shot rather than a distance shot since '
when I see myself I see a pufferfish' is the first line of my poem. I think it would be better to not reveal the full object in the first shot of the film.
I also decided to test out a z-depth pass in Arnold. I created a custom AOV since there didn't seem to be any depth of field or z-depth pass in the presets. It appeared to work fine in the render view (adjusting the exposure allowed me to see the image better) but the resulting render came out quite differently despite trying out different file types (EXR, 32-bit Tiff). I struggled to get the map to look like the way it did in the render view (I'll include a screenshot of it in Maya and in AE)...in fact it was very different so I suspect making a silly mistake somewhere. I'll continue to research how to do this so I can hopefully do it correctly.
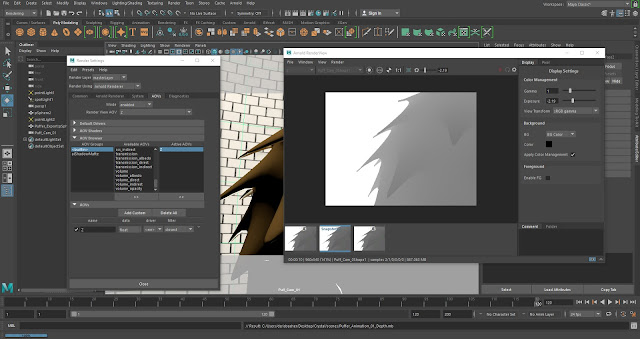

Until then, I do quite like how the depth pass makes the animation look even if it is incorrect. I tried my best work with what I had by adjusting the levels and adding some Gaussian blur to the depth passes. I then linked the depth map up to the Camera Lens Blur effect, experimenting with the Blur Focal Distance. After that I adjusted the colour/contrast of the beauty pass and added a slight motion blur effect, a vignette and film grain. I really enjoy tweaking these effects because I think even subtle changes can really improve how a scene looks (in most cases at least).


Yes - I think this shot is an exciting glimpse of how this space of yours is going to work. One thing I'm interested in aesthetically is what happens if your 'tile room' is actually more white and sterile-seeming - at least it can have this quality while perhaps you have a fluorescent light flickering thing that plunges the same space into a gloomier more 'Silent Hill' space as the film demands it. Yes, I'm thinking of A Cure For Wellness here - but also I think it might be less 'evil hospital' and 'horror' this way and that might be more honest. It begs questions re. the use of projections - but I'm wondering if the 'glitch' interruptions might be the most potent means of introducing found footage... just thinking out loud really...
ReplyDeleteYeah I like the idea of experiment with it being lit differently...of course once I increase the light it'll make it difficult or impossible to have the projections show up. But I did like integrating clips of live action footage/home video into my development 'showreel', which would give me more freedom with lighting the CGI space.
Delete